by Hope
We spent the weekend in construction mode. I decided a month or so back that Little Gymnast would move into the twins room for the summer no matter what we decided as far as long term housing. He’s just at the age and with them working quite a bit this summer, it was a good time to make the move.
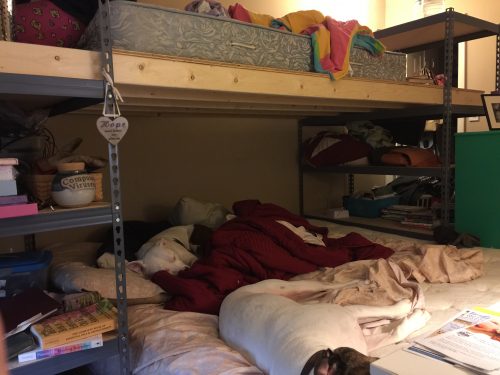
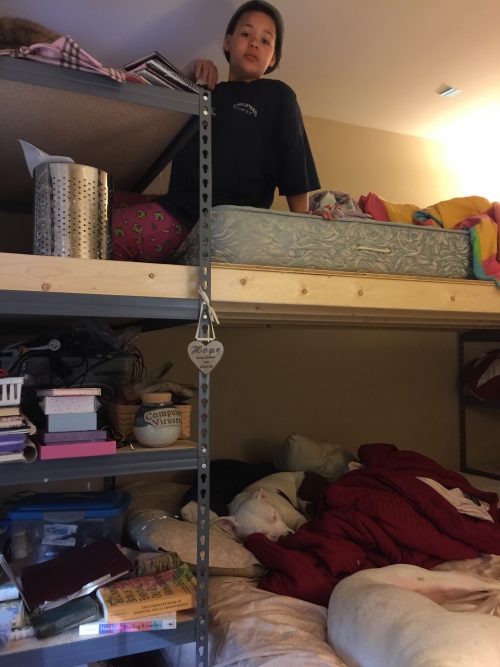
I researched bunk beds, custom built lofts, diy lofts and as I was at the hardware store pricing things needed, I came up with my own brilliant, if I do say myself, design. I called my dad as he has years of construction experience and ran my idea by him to make sure it was viable. With just a few modifications, he thought it would work and for just a few dollars more than a traditional bunk bed we created our own custom lofts in the two bedrooms. Figured a picture was better than my description. Please excuse the messiness, we are still organizing and arranging.

We purchased the following to complete this project:
- Four steel utility shelving units, 2 per loft at $72 each
- Eight 2″x4″x10′ to bolster the lofts at $3 each
- Two sheets of plywood originally 4’x8′ but they trimmed the width down 2″ for free at $20 each
- One box of nails at $3.60
- One twin mattress at $119
Each loft (not counting the single mattress) cost right at $178 each. The design solved multiple problems in one fell swoop ie storage, desks and separate beds. They are identical in the two rooms with the exception of my king size bed under Princess’ bed and both the twins’ beds under Little Gymnast.

You will see in this picture that Princess and Gymnast both have plenty of room to sit up in their beds and are using the top shelves have made desks. We’ve then been able to use the remaining shelves for much needed storage…shoes, extra blankets and possibly a stock pile of home goods that up until now we had no way to store.
Everyone is proud of a job well done, appreciates the new “private” space and is getting settled into the new boundaries and room situations. Overall, I think we have solved the bulk of the larger issues we were encountering with our small space living. And I’m pretty proud of the design.
Next up…dining room tables out of extra piece of plywood we already have and a set of saw horses. Just trying to figure out how to stabilize the plywood to keep it from warping.
Update: When I first wrote this, I forgot to say where this money came from and I’m sure it will be asked. We did not break out of our extreme budget. We used monies earned from the massive purge last fall when we were downsizing – between the individual item sales and garage sales we socked away right at $2048 which has been saved towards furniture. Aside from a few odds and ends in our new place, that money has remained untouched.

Hope is a creative, solutions-focused business manager helping clients grow their business and work more efficiently by leveraging expertise in project management, digital marketing, & tech solutions. She’s recently become an empty nester as her 5 foster/adoptive kids have spread their wings. She lives with her 3 dogs in a small town in NE Georgia and prefers the mountains to the beaches any day. She struggles with the travel bug and is doing her best to help each of her kids as their finish schooling and become independent (but it’s hard!) She has run her own consulting company for almost twenty years! Hope began sharing her journey with the BAD community in the Spring of 2015 and feels like she has finally in a place to really focus on making wise financial decisions.


They look great, seems like it would have been a fun thing to do even without the benefit of getting the extra space!
It was alot of fun to do, and even better to get to do two of them. We were able to perfect the design with the first one, doing it a day earlier and getting to “sleep” on it. So with the second one, we did a few modifications to make it that much better, ie sturdier!
Great solution, Hope! I’ve been watching a lot of Tiny House Nation lately and the ingenious use of vertical space is key to their designs. I also think it’s great to get kids involved in construction projects. It makes all of their math lessons come to life and reinforces critical and creative thinking skills.
Oh, and I love the two pups passed out on the bed! All most dogs really want in life is somewhere comfy to take a really long nap! (And food, ear scratches, and the entire pack sitting in one room.)
Yes, two of the dogs sleep wherever they want (the smaller of the two white dogs is still crated at night as she still likes to chew on things when no one is watching.) I like that they give me a valid excuse not to make my bed very often…they just jump up on it and mess it up.
Most definitely! My daughter’s favorite channel is HGTV, not that we get to watch it very often, but our apartment complex office plays it all the time, so when she has a break, she heads over there.
The math in this was fun…and it’s fun to watch the kids’ “aha” moment when they really get it rather than mom just explaining. Then they go off on their own with even more ideas.
This is ingenious! Such a clever solution and a very practical design! I love it! Great job, you guys!!!
Thanks, Ashley, it was a lot of fun. After these past months immersed in house design and research…well, I think I would have loved going into construction or architecture. But then again, I might not have had so much fun with it if it weren’t for myself.
Now trying to come up with other zany ideas to make our space even more “big” and efficient.
It looks so cozy to be in one of those beds with shelving around you! I love it! But, how does the top bunk person get down without jumping onto the bed below?
Ha! That it seems is the thing we didn’t think of. They climb up easily on the shelves, but despite what I thought, climbing down…not so much. So right now, they are simply falling/jumping down to the bed below, approx 3′ drop. Little Gymnast came in this morning and asked if we could get a ladder. So this is a problem I’ll be working on.
BTW, I do have one ladder in our storage closet outside, just seeing how to make it work and if it will work.
Love the creativity in this idea.